Configuring network access to storage accounts
You can secure your storage account to a specific set of supported networks which are granted access by configuring network rules so that only applications that request data over the specific set of networks can access the storage account. When these network rules are effective, the application needs to use proper authorization on the request. This authorization can be provided by Azure AD credentials for blobs and queues, with a SAS token or a valid account access key.
Public endpoint and Azure Virtual Network (VNet) integration
By default, storage accounts are provisioned with a public endpoint, and thanks to the enhanced control Azure offers, network traffic can be limited to those trusted IP addresses and networks to which you have granted access on Azure. For good security practice, all public access to storage accounts should be set to deny for the public endpoint by default. The network rules defined for the storage account will apply across all protocols, including SMB and REST; therefore, to allow access, an explicit rule will need to be defined. There are additional exceptions that can be configured that give you the ability to allow access to Azure services on the trusted services list to the storage account, as well as configuring logging and metric access for any networks (such as for Log Analytics).
Top Tip
When integrating a resource with an Azure VNet, your VNet needs to exist within the same region as your resource.
In the following demonstration, we are going to configure network access to the storage account that we created in the previous chapter to restrict network access to a specific network in Azure, as well as allowing our public IP to communicate:
- Navigate to the Azure portal by opening https://portal.azure.com.
- Go to the storage account we created in the previous chapter.
- On the Storage account blade, select Networking from the left menu under Security + networking.
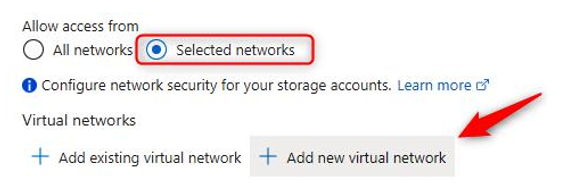
- Click Selected networks under Allow access from and then click Add new virtual network. Notice that we can create a new network or choose an existing one.

Figure 7.1 – Storage accounts – Adding a VNet
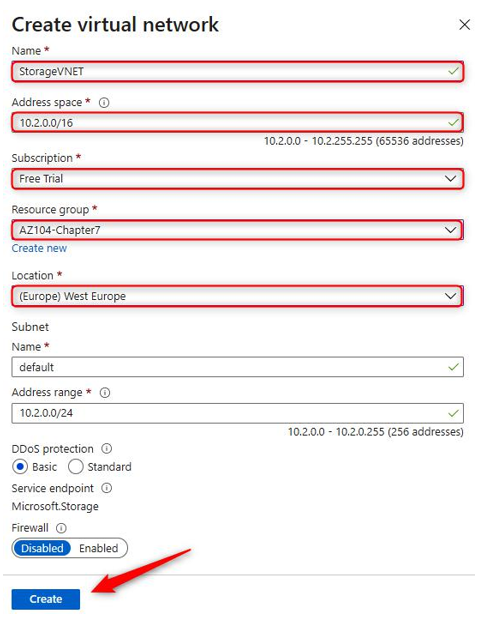
- Enter a name and address space, select a subscription, resource group, and location, and then leave all other settings on their default values and click Create. You will note that the VNet can be created in a different resource group; it can even be in a different subscription.

Figure 7.2 – Storage accounts – Creating a VNet
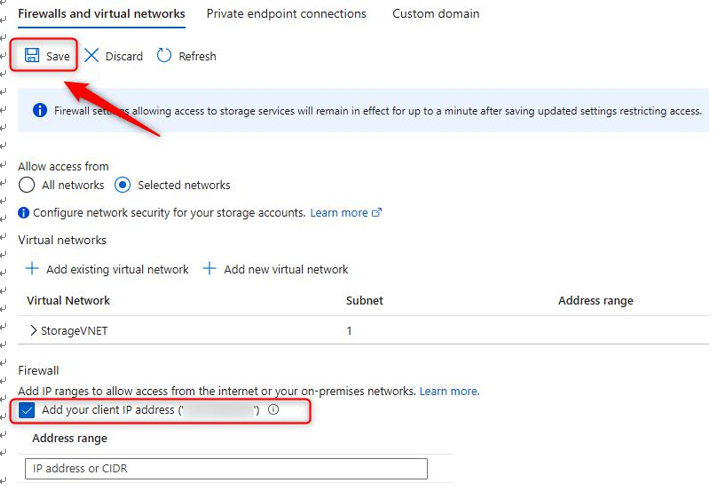
- Now, click the Add your client IP address checkbox and then click Save.

Figure 7.3 – Storage accounts – Configuring the firewall and VNets
- You have now locked down access to the specified network and your public IP address. Open Storage Explorer (preview) on the left menu.
- Open FILE SHARES, click on any of your folders, and note that it is accessible. You can confirm its functionality by uploading a file to the service.
- To demonstrate the effect of IP restriction from the firewall configuration, navigate back to the Networking blade by clicking Networking on the left menu. In the Firewall context section, click the trash can icon to delete your IP and click Save.

Figure 7.4 – Storage accounts – Deleting a public IP
- Now, navigate back to Storage Explorer (preview), click FILE SHARES once more, and open the share you used previously. Note that you are denied access now. Click OK.

Figure 7.5 – Storage accounts – Authorization failure
You have now completed this section on network restrictions on public endpoints. Should you wish to test connectivity with this, you can deploy a VM in the same VNet as the storage account and connect to the storage account from inside the VM. In the next section, we will discuss private endpoints.